Configuring Rocky Linux, FreeIPA and Samba for Kerberos Support on Windows Clients
Authored by Lachlan Davidson • November 30, 2021
Background
FreeIPA is an open-source identity management system, maintained by Red Hat. I’ve been wanting to use FreeIPA in my homelab for a while to streamline identity management, open the door to LDAP magic, flexible Kerberos auth to my shares and services, and possibly even FreeRADIUS at some point.
I’ve been looking at solutions like TrueNAS, Proxmox, Unraid, etc. for hosting my file shares and decide none of them quite do what I want for my homelab, as they are quite heavy, opinionated, do far too many things I don’t need and I’m generally a fan of keeping things vanilla and separate.
I’ve recently become quite a big fan of Rocky Linux. It’s an enterprise-grade downstream distribution of Red Hat, aiming to fill the gap CentOS is going to leave.
I also don’t want to domain-join my machine, or god forbid, set up an AD environment.
Perhaps FreeIPA, Rocky, Kerberos and Samba could be a match made in heaven?
Motivation
I chose to write this guide because I struggled to find accurate, up-to-date information on how to do, well, any of this. Many of FreeIPA’s own guides are very out-of-date, half the suggested commands and config options no longer exists, and newer versions of Samba have quite different requirements.
Scope
In this post, I aim to articulate the process of setting up a basic homelab FreeIPA installation on Rocky Linux with a Samba share, and enrolling a Windows client into the Kerberos realm, without needing to domain-join the machine (as this is not realistic with FreeIPA alone, or what I want regardless).
Versions Used
Rocky Linux: 8.5 (Green Obsidian) FreeIPA: 4.9.6 Samba: 4.14.5
Installing Rocky & FreeIPA
Base Install
First off, grab yourself an ISO over here. I’m going to be installing this in a VM using libvirt, but feel free to install on whatever :-).
Go through the initial install basics, select your language, keyboard layouts, timezone, set a root password & initial user, etc.
Don’t forget to enable your networking!


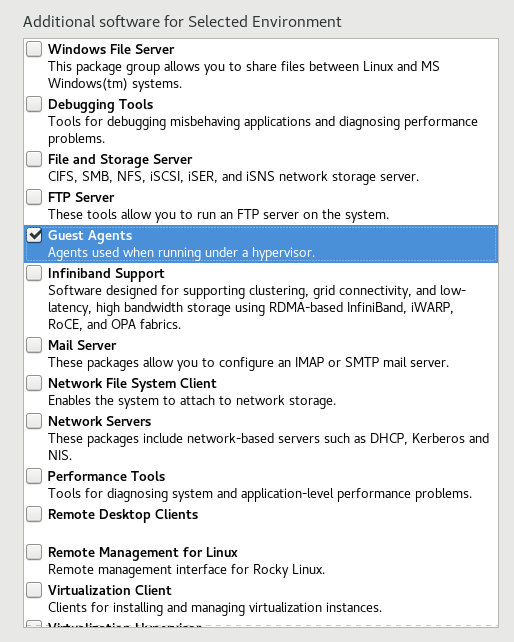
Before beginning the installation, make sure you check out Software Selection, and install anything you’d like then chose your prefered environment. I’m personally just going to stick with Server with GUI.

Now, it’s important to note a lot of things in here might sound appealing to install and relvant for our purposes, however important packages will be installed automatically when we set up FreeIPA. Personally, I was a bit worried if I jump the gun in installing certain packages, I might get dirty configuration leading to later headaches.
I chose only to select “Guest Agents”.
Then, proceed with the installation. Once booted into Rocky, we can begin.
FreeIPA Install
Overall, initial set up is quite painless. You’ll want to choose a name for your new realm/domain, I’m personally going for FRUITBOWL.LOCAL.
We can start by setting our hostname, then might as well make sure our system is up to date and quickly reboot:
[root@localhost ~]# hostnamectl set-hostname ipa.fruitbowl.local
[root@ipa ~]# dnf update -y
...
[root@ipa ~]# reboot
Once it’s finished rebooting, we just need to enable the IDM server DNF module, and install the initial packages.
[root@ipa ~]# dnf module enable idm:DL1
...
Is this ok [y/N]: y
Complete!

[root@ipa ~]# dnf install -y freeipa-server freeipa-server-dns
...
Once that’s installed, we can begin the setup process by running ipa-server-install.
Personally, I’m going to choose yes to configuring integrated DNS, and when I get around to it, I’ll tell my network’s main DNS server to forward to my FreeIPA box for all .local requests.
Through the rest of the setup, I’m going to configure the following:
-
Forward to
1.1.1.1for all other DNS lookups -
Hostname of
ipa.fruitbowl.local -
Domain name of
fruitbowl.local -
Kerberos realm name of
FRUITBOWL.LOCAL -
A very strong Directory Manager password and admin user password (making these both different)
[root@ipa ~]# ipa-server-install

==============================================================================
This program will set up the IPA Server.
Version 4.9.6

This includes:
  * Configure a stand-alone CA (dogtag) for certificate management
  * Configure the NTP client (chronyd)
  * Create and configure an instance of Directory Server
  * Create and configure a Kerberos Key Distribution Center (KDC)
  * Configure Apache (httpd)
  * Configure the KDC to enable PKINIT

Server host name [ipa.fruitbowl.local]:
...
Please confirm the domain name [fruitbowl.local]:
...
Please provide a realm name [FRUITBOWL.LOCAL]:
...
Directory Manager password:
Password (confirm):
...
IPA admin password:
Password (confirm):
...
Do you want to configure DNS forwarders? [yes]:
Following DNS servers are configured in /etc/resolv.conf: 1.1.1.1
...

The IPA Master Server will be configured with:
Hostname:       ipa.fruitbowl.local
IP address(es): 10.10.12.18
Domain name:    fruitbowl.local
Realm name:     FRUITBOWL.LOCAL

The CA will be configured with:
Subject DN:   CN=Certificate Authority,O=FRUITBOWL.LOCAL
Subject base: O=FRUITBOWL.LOCAL
Chaining:     self-signed

BIND DNS server will be configured to serve IPA domain with:
Forwarders:       10.10.12.1
Forward policy:   only
Reverse zone(s):  No reverse zone

Continue to configure the system with these values? [no]: yes
After choosing config options, the setup can take a good while, so go grab a coffee.
We’ll want to set up some firewall rules now, so I’m just going to enable cockpit, as I like to manage my firewall rules from there.
[root@ipa ~]# systemctl enable --now cockpit
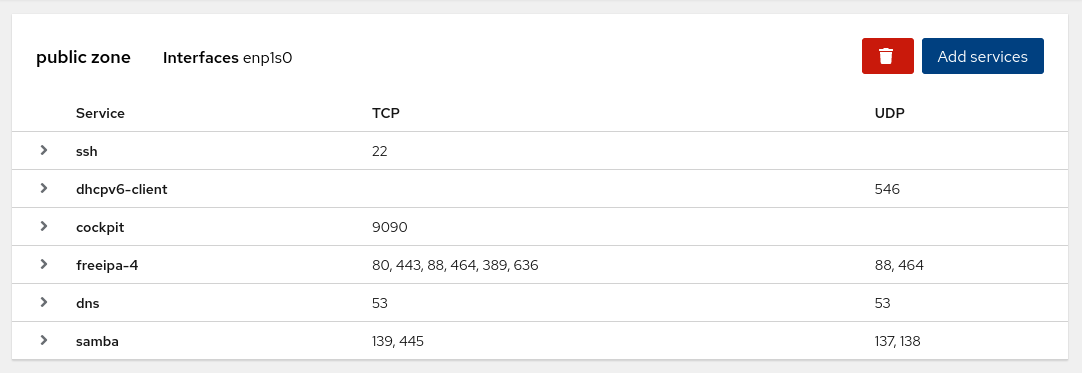
From within cockpit, I’m just going to navigate to Networking -> Edit Rules/Zones -> Add services (public zone) and search and tick both freeipa-4, samba and dns.
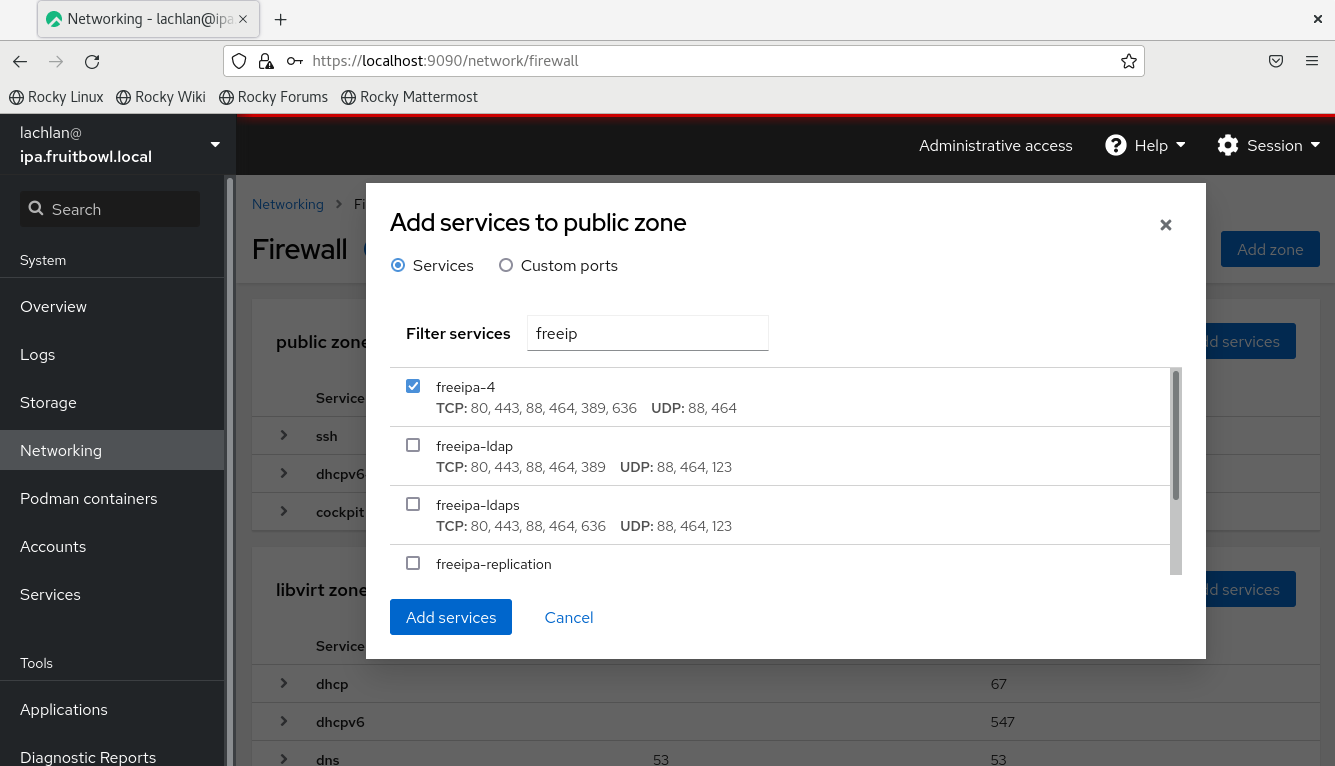
The config should now look something like this:
FreeIPA & Samba Configuration
Now, we can simply navigate to ipa.fruitbowl.local in our browser, and we should be presented with the IPA web config.
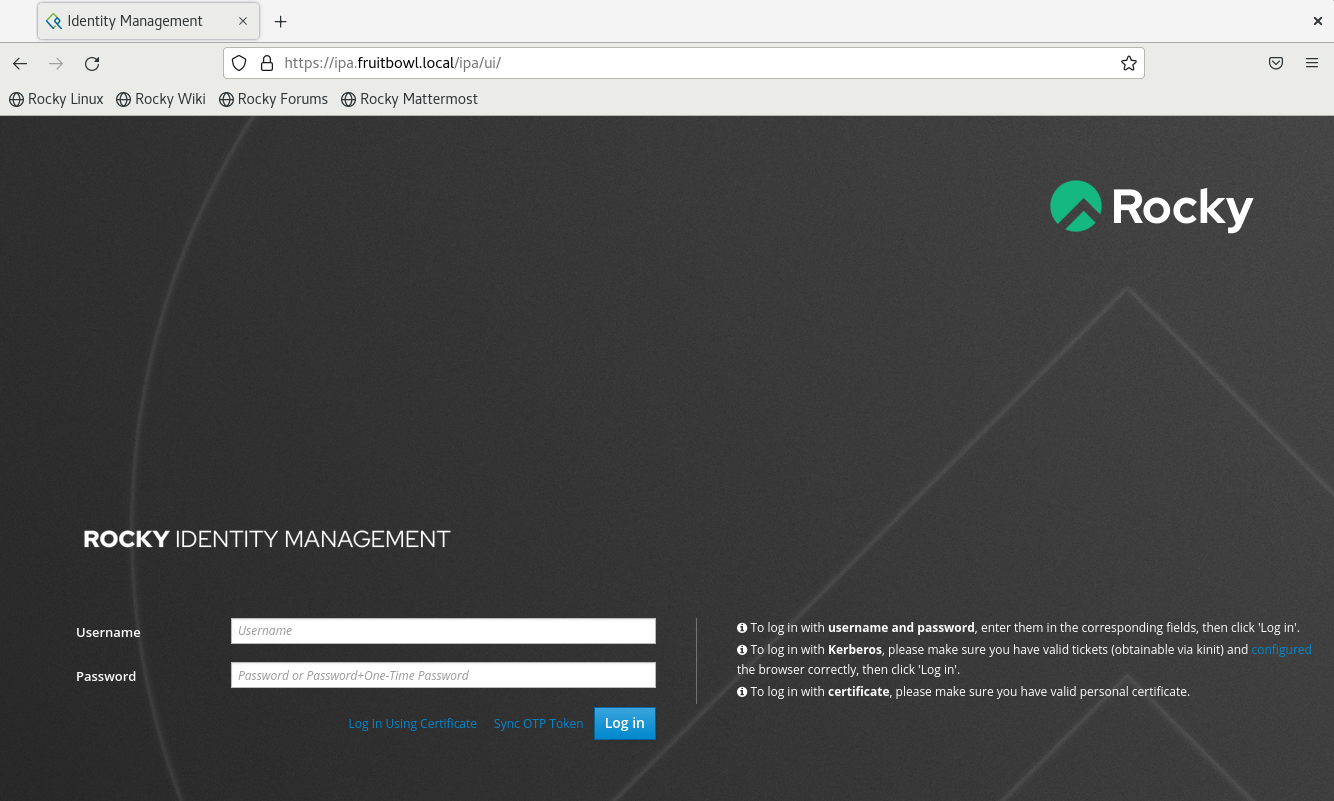
Before we go any further, I’m just going to log in and create myself an account, which I will add to the admins group, which we will use later on.
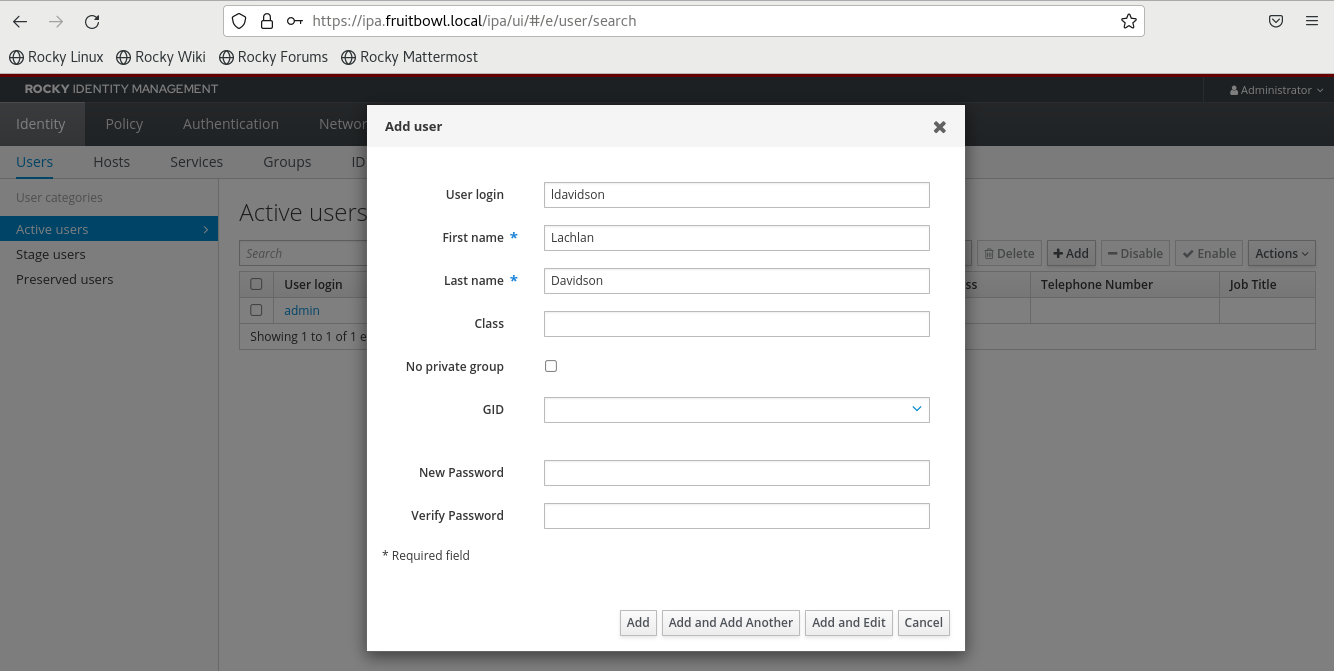
It’s important to log in to this account on the web interface, to perform the mandatory initial password change.
Now, onto the configuration. First off, we’re going to set up required packages and config that is normally used to enable trust relationships between FreeIPA and Active Directory, namely ipa-server-trust-ad. However, instead, it can be useful for just getting all the right things set up for Samba to work as we need it.
Just install the ipa-server-trust-ad package and run ipa-adtrust-install. You’ll need to enter your admin password for the domain, and then tell it you’re happy to have your existing smb.conf nuked. I also chose yes to “Enable trusted domains support in slapi-nis?”, I’m not really sure what it’s for, and this may be unecessary. I also generated SIDs, as I noticed a few guides from years past also did this.
[root@ipa ~]# dnf install -y ipa-server-trust-ad
...
Complete!

[root@ipa ~]# ipa-adtrust-install
This program will setup components needed to establish trust to AD domains for
the IPA Server.

This includes:
  * Configure Samba
  * Add trust related objects to IPA LDAP server

To accept the default shown in brackets, press the Enter key.

Configuring cross-realm trusts for IPA server requires password for user 'admin'.
This user is a regular system account used for IPA server administration.

admin password:

WARNING: The smb.conf already exists. Running ipa-adtrust-install will break your existing samba configuration.

Do you wish to continue? [no]: yes
...
Enable trusted domains support in slapi-nis? [no]: yes
...
NetBIOS domain name [FRUITBOWL]:
...
Do you want to run the ipa-sidgen task? [no]: yes

The following operations may take some minutes to complete.
Please wait until the prompt is returned.
Once this completes, I’ll configure a simple share, editable by all administrators.
[root@ipa ~]# mkdir /srv/test-share
[root@ipa ~]# chcon -t samba_share_t /srv/test-share
[root@ipa ~]# setfacl -m g:admins:rwx /srv/test-share
[root@ipa ~]# net conf addshare shared /srv/test-share writeable=y guest_ok=N
Now, that should be (almost) it from the FreeIPA server config side of things!
Connecting Windows Client
For our Windows client, I’m just going to use a fairly barebones Windows 10 Home installation for demonstration’s sake.
The machine has a hostname of test-machine, and only one user - Lachlan Davidson.
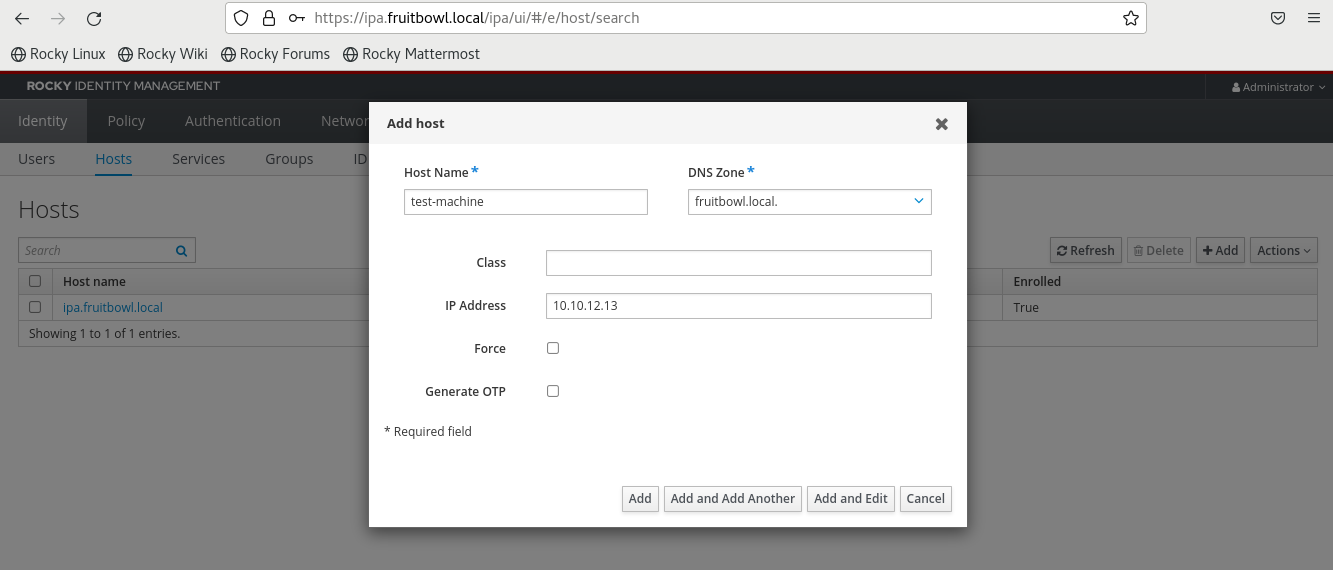
Creating Host Principal
I know I said we were more or less done with FreeIPA, but we need to create a host principal for our Windows client, matching both the hostname and IP address of the machine.
Finally, we need to set a long, strong, random machine password for this host. This command also creates a keytab file which we don’t need, so we can just delete that.
[root@ipa ~]# kinit admin
Password for [email protected]:

[root@ipa ~]# ipa-getkeytab -s ipa.fruitbowl.local -p host/test-machine.fruitbowl.local -k /tmp/test-machine.keytab -P
New Principal Password:
Verify Principal Password:
Keytab successfully retrieved and stored in: /tmp/test-machine.keytab

[root@ipa ~]# rm /tmp/test-machine.keytab
Windows Setup
Now, hopping onto our Windows box, we can start doing the fun stuff :)
First, make sure your DNS server is set to the FreeIPA box, then we can run the following commands in an elevated shell:
PS C:\Windows\system32> ksetup /setrealm FRUITBOWL.LOCAL
PS C:\Windows\system32> ksetup /setdomain FRUITBOWL.LOCAL
PS C:\Windows\system32> ksetup /addkdc FRUITBOWL.LOCAL ipa.fruitbowl.local
PS C:\Windows\system32> ksetup /addkpasswd FRUITBOWL.LOCAL ipa.fruitbowl.local
PS C:\Windows\system32> ksetup /setcomputerpassword [MACHINE PASSWORD YOU SET BEFORE]
PS C:\Windows\system32> ksetup /mapuser [email protected] "Lachlan Davidson"
PS C:\Windows\system32> ksetup
default realm = FRUITBOWL.LOCAL (external)
FRUITBOWL.LOCAL:
    kdc = ipa.fruitbowl.local
    kpasswd = ipa.fruitbowl.local
    Realm Flags = 0x0No Realm Flags
Mapping [email protected] to Lachlan Davidson.
The first few commands are fairly self explanatory, we set the domain, realm kdc host, etc. But, that final command is the most notable one: ksetup /mapuser [email protected] "Lachlan Davidson". This is where we tell Windows “Hey, the local Windows user Lachlan Davidson is the user [email protected] in the Kerberos realm”
You can also specify ksetup /mapuser * *, which effectively tells Windows: “Hey the local user jimbob is [email protected], mary would be [email protected]” and so on.
Finally, after making all these changes, you’ll need to reboot.
After rebooting, we just log into our local account as per normal, no domain screwy stuff here.
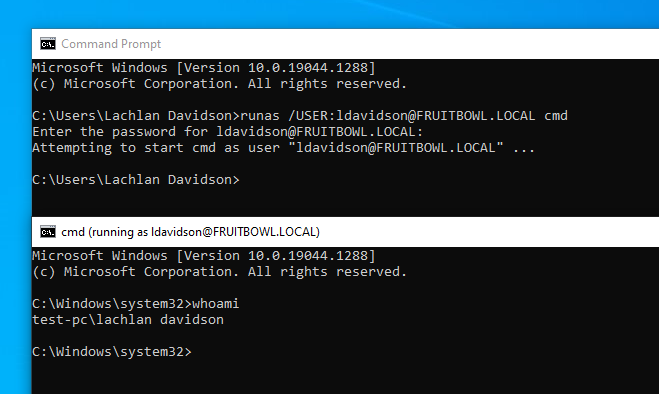
We can confirm our Kerberos authentication and user mapping has worked by trying to spawn a shell as our FreeIPA user: runas /USER:[email protected] cmd.
We’ll be prompted for our password, and the shell should open. Running whoami confirms we have successfully mapped [email protected] -> test-pc\lachlan davidson.
Finally, I was able to simply navigate to \\ipa.fruitbowl.local\and access my SMB share!
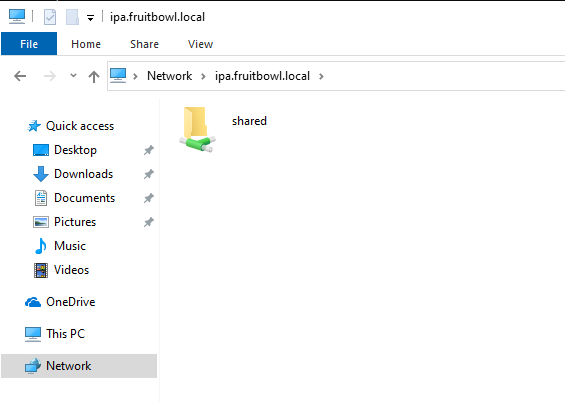
I can now finally use my share and all is well :)
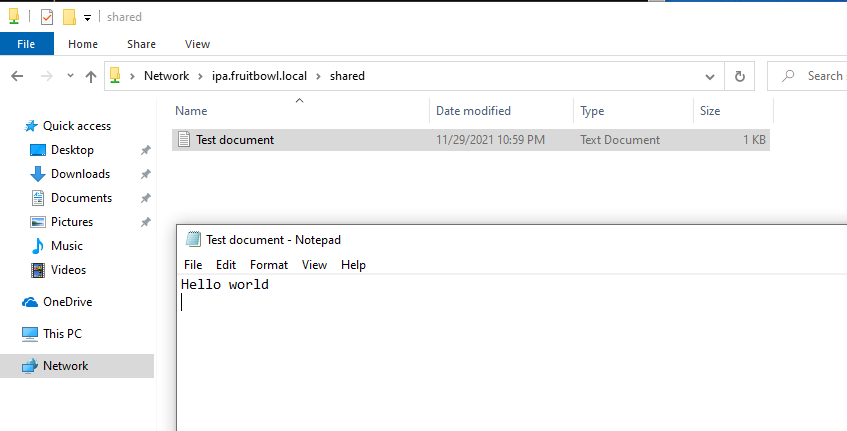
We can check it out, and sure enough the file has appeared on our share folder on the server.
[root@ipa test-share]# cat Test\ document.txt
Hello world
Conclusion
Overall, this was a very fun experiment. One of the drawbacks often mentioned about FreeIPA is poor compatibility with Windows client where AD isn’t present. However, I believe that my setup proves that to be a myth. I still get all the advantages of a Linux-focussed Kerberos, however my Windows clients don’t fall behind, and I don’t even need to domain-join them or anything funky.
Let me know if this guide was helpful :)